Boat Repair Guides with Various Techniques
REPAIR WITH EPOXY RESIN
This guide explains how to repair a hole in a fiber-reinforced plastic (glass fiber) laminate
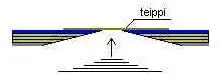
If necessary, tape over the hole from the outside. You can also use peel ply against the patch to create a ready-to-bond surface for filler or paint. The actual laminating must be done using fiberglass fabric (twill or multiaxial) when working with epoxy — not chopped strand mat. Chopped strand mat is not compatible with epoxy. Cut suitable pieces of fabric while dry. The largest piece should match the size of the sanded area, with each subsequent layer decreasing in size accordingly.
Protect skin
Before handling epoxy, ALWAYS remember skin protection: wear a long-sleeved shirt and epoxy-resistant disposable gloves. Tools can be cleaned with acetone, but keep in mind that epoxy is really good glue and will stick to almost anything - including tools. So use cheap tools that you can throw away. Epoxy resin is harmful to health and the environment. Epoxy hardener, on the other hand, is a strong skin sensitizer.
Epoxy amount and mixing
The amount of epoxy resin required is approximately 1.5 - 2 x the weight of the fabric. If 200 g/m2 of fabric is used, 300 - 400 g/m2 of resin will be needed to wet a piece. Always follow the epoxy mixing ratio as specified in the instructions - not too much or too little hardener. The best tool for dosing is a small scale wrapped in a transparent plastic bag. Medical syringes are an excellent way to measure small amounts of epoxy and hardener (each with its own syringe). Once you have measured out the right amount of epoxy resin and hardener into the container, mix carefully - always scrape the bottom and sides of the container with a mixing stick. The epoxy will not cure if the dosage ratio is incorrect, the mixing is not done properly or the temperature is too low.
Working
Always start by applying resin first, then placing the fiberglass on top. Begin laminating with the largest piece of fiberglass (resin underneath, fabric on top). No air must be left under the fabric. Air can be removed by rolling with an aluminum laminating roller, 'dabbing' with a brush, or drawing it out with a rubber squeegee. For small repairs, a brush is sufficient. For larger jobs involving more than 1 m² of fabric, it’s better to use both a wet-out roller and a brush (and of course, finish with aluminum roller). The following layers of fiberglass can be laminated immediately, from largest to smallest. However, if you need to work below the repair spot, it’s wise to let the first layer cure before laminating the next ones
Temperature
Repairs are best carried out in warm conditions – for example, at around +18-20 °C. At this temperature, Ampro epoxy can be used with either a fast or slow hardener. When the repair temperature is close to +15 °C, a fast hardener should always be used. If the temperature drops below +15 °C, proper curing cannot be guaranteed. High air humidity can also affect curing. Adding more hardener will not improve curing with epoxy; instead, the hardener must always be measured accurately according to the instructions. When making repairs in cold conditions: store the epoxy resin and hardener in a warm place (you can pre-warm them, for example, to +30 °C). Use a heat gun or try to carry out the repair in direct sunlight. Additional heating should be maintained throughout the entire curing period. When referring to temperature, it always means the temperature of the object being repaired – if it’s +20 °C on a sunny surface but only +15 °C at the repair site, curing will be slower. Likewise, if the garage wall is +18 °C but the boat is on a concrete floor in +12 °C temperature, curing will be slow.
Once the repaired area has been laminated, remove the tape and any peel ply. Sand down any sharp edges or major surface irregularities. If the repair area needs to be leveled, you can make a good filler by mixing Ampro resin with micro glass balloons. This type of filler is easy to sand..

Preparation
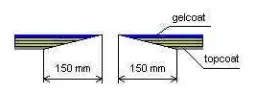
If possible, the repair laminating should be done from the inside (i.e., the uneven, rough, non-molded surface). Begin by sanding the damaged area, extending approximately 10-15 cm beyond the damage in all directions. Use sandpaper with a grit of 40–60. The sanding should be deeper at and near the damaged spot, and gradually tapered toward the intact laminate. If you use a power tool for sanding, make sure to finish by hand to create visible scratches in the surface — this will improve adhesion by making the surface even rougher. The repair area in the laminate should form a wide enough taper to provide a large bonding surface.

Surface finishing
Epoxy surfaces can be painted with either epoxy or polyurethane paints. Note! Do not apply polyester-resin-based topcoat over epoxy — it will not adhere properly! It’s recommended to apply a sufficient amount of paint so that it stands slightly above the laminate surface. The paint surface of the repair patch will then be wet sanded smooth using grit 1000 or finer.
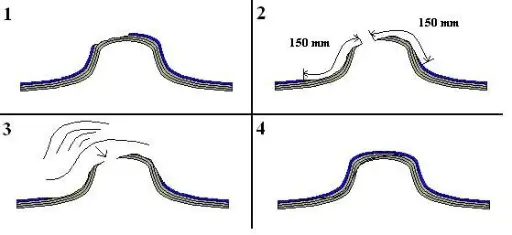
Keel repair
The following images illustrate how to repair the keel of a typical rowing boat. If there is polyurethane foam between the outer and inner hull — which in many cases has absorbed some moisture — the wet foam must be removed and replaced with fresh polyurethane foam (or epoxy foam). Note! One-component sealing foams supplied in pressure cans are not suitable for filling enclosed spaces; they are intended for applications like window frame sealing, where the foam has continuous access to ambient moisture. Polystyrene (Styrofoam) is not resistant to polyester resin, but epoxy can be applied on top of it
Using the method described above — with slight adaptations — you can easily repair other types of damage to fiber-reinforced plastic laminates as well - for example a failure of a seat bonding in a rowing boat, or a loose bulkhead joint in a larger vessel. Never skip proper surface roughening. Simply wiping a finished fiberglass surface with a chemical like acetone will not create a surface where you can bond the repair patch
Store epoxy resin and hardener preferably in a cool place away from direct sunlight. Do not allow them to freeze. When epoxy resin freezes, it becomes solid (crystallizes) and is difficult to return to a usable state.
If you make the repair with polyester resin and topcoat, you can use part of these instructions as a guide line.