Making a river table with resin
A river table is a striking and durable interior piece that combines natural wood with translucent resin. The process requires care and the right steps, but it can be done successfully in a home workshop as long as you use high-quality materials and the proper tools and protective equipment.
Planning and preparing materials
Before starting, it’s important to plan the table’s size, shape, and style. Choose suitable wood, such as a live-edge slab, which will form the sides of the “river” filled with epoxy. The wood serves as the table’s structural element, so its quality is essential for a successful final result.
Decide how wide and deep the “river” will be, and whether you want to use clear or tinted resin. You will need at minimum resin and hardener, optional color pigments, mold materials, sealing products, sandpaper and finishing products. Protect your workspace carefully and make sure ventilation is adequate and the area is dust-free.
Building the mold and pre-treating the wood
To pour the resin, you’ll need a mold. The mold can be made from plywood or another smooth-surfaced material. All seams and corners must be sealed thoroughly so that epoxy cannot leak out. It’s a good idea to treat the inside surfaces of the mold with a release agent, which makes it easier to remove the table after curing.
Sand the wood surfaces intended for the table and clean off dust and grease. If the wood has cracks or knot holes, these can be filled before the pour. It’s important that the wood is completely dry - moisture can cause bubbling and weaken the bond between the epoxy and the wood. Once the wood pieces are placed in the mold, secure them firmly so they won’t move during the pour.
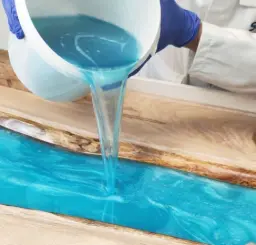
Mixing and coloring the epoxy
Mix the epoxy resin according to the manufacturer’s instructions. The exact mixing ratio between resin and hardener is critical for proper curing. Stir slowly but thoroughly until the mixture is uniform. After that, you can add color pigment if you want to create, for example, a blue, turquoise, or smoky gray “river.”
Let the mixed epoxy rest for a moment so air bubbles can rise to the surface. You can remove bubbles carefully with a heat gun.
Pouring
When everything is ready, pour the epoxy slowly between the pieces of wood. If the tabletop is thick, it’s best to pour in multiple layers. This reduces heat buildup and helps prevent the epoxy from boiling or cracking. After each layer, remove any air bubbles before pouring the next one.
After pouring, the mold should not be moved, and the ambient temperature should stay stable during curing. Curing time varies by product, but typically ranges from one day to several days.
Curing, sanding, and finishing
Once the epoxy has fully cured, the table can be removed from the mold. Sand the surface first with coarser grit and then progressively finer sandpaper until you reach the desired smoothness and shine. The wooden parts of the table can be treated with oil, wax, or varnish, which protects the surface and highlights the wood’s natural grain.
As the final step, attach the table legs or base. It’s recommended to check that the surface is level and that the legs are securely fastened before use.
Useful tips
Air bubbles are the most common issue when working with epoxy, so pay special attention to removing them. Always work in a well-ventilated space and use protective equipment. If you’re using colored epoxy for the first time, make a small test pour before starting the actual project.