Vacuum bagging by hand laminating
In vacuum bagging, the part is manufactured using an open mold. One mold surface is replaced by a vacuum bag or a flexible mold half. In the basic method, resin is drawn into the reinforcements using vacuum. In some cases, the injection process can be accelerated with positive pressure. Naturally, the positive pressure must be lower in absolute value than the vacuum for the method to function properly. Resin flow can be improved using separate resin flow layers, specialized reinforcements, and in sandwich structures, by grooving the core material. Various meshes are used as resin flow layers. Examples of specialized reinforcements include combination fabrics, which feature a felt layer with high resin flow capacity in addition to standard reinforcement layers.
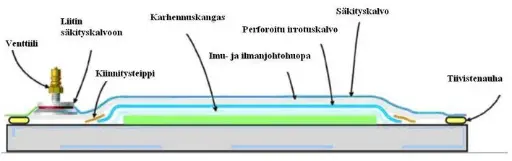
The principle of the vacuum bagging method is illustrated in the image below. If a smooth surface is desired on both sides of the product, or if the production volume is sufficiently large, the vacuum bag can be replaced with a flexible mold half, which often also incorporates resin flow channels and edge seals for the mold. The flexible mold is typically made from elastomer or fiber-reinforced plastic.
In film infusion, the matrix resin is in the form of a film—either as a single layer on the mold surface or layered between dry reinforcement plies. The resin is in a semi-cured B-stage, so it must be heated to become flowable before the actual infusion. The resin primarily flows into the reinforcements in the thickness direction. The main advantage of the method is the very short flow path.
Compared to hand lay-up, infusion methods are faster and offer better repeatability. The processes are also closed, preventing the release of volatile substances into the work environment. Placing the reinforcements in the mold is relatively easy, as dry reinforcements are being handled. If needed, the reinforcement layers can be bonded together mechanically or with a binder, such as spray adhesive. A key advantage of vacuum and film infusion over pressure injection is the ability to use cost-effective open molds.
Vacuum bagging with hand lay-up
This guide provides an example of manufacturing a carbon fiber plate using hand lay-up with vacuum bagging.
You will need epoxy resin, carbon fiber fabric, a mohair roller, acetone, a release agent, a mixing container, a mixing stick, sharp scissors, lint-free cloth, vacuum bag film, breather fabric, release film, (peel ply), sealant tape, a vacuum pump, tubing, and a base plate (e.g., a metal sheet).
Step 1: Preparing the Base Plate
Clean the mold of grease, dirt, and dust using acetone. Chem-Trend also offers a dedicated cleaning agent for this purpose: Mold Cleaner EZ.
There are many release agent options available. In this example, we use Chemtrend’s Chemwax as the release agent. It is a high-quality release wax suitable for demolding composite parts. The release wax is applied evenly using a lint-free cotton cloth—first in vertical strokes up and down, followed by horizontal strokes side to side. When viewed against the light, you should be able to confirm that the wax has been applied to the entire surface. Note: Do not apply wax to the edges of the plate, as the sealant tape must adhere properly to the surface.
Step 2: Cutting the Fabrics and Films
The carbon fiber fabric is cut to the correct size. In this example, Hexcel's Primetex 160 g/m² twill carbon fiber fabric is used. All necessary layers are cut in advance. The final laminate will be stronger if the fabric layers are stacked with varying orientations.
Peel ply is used when the laminate surface will be coated or painted later. As the name suggests, peel ply creates a rough surface on the laminate. Using peel ply has two advantages: it protects the laminate from dirt and dust, and it eliminates the need for sanding before applying a surface coating. The peel ply is cut slightly larger than the carbon fiber fabric. However, the use of peel ply is not strictly necessary.
The purpose of the release film is to prevent the laminate and breather fabric from sticking to each other. In this case, the release film must be perforated. The denser the perforations, the more excess resin can escape from the laminate. The release film is cut larger than the carbon fiber fabric but smaller than the base plate.
The purpose of the breather fabric is to absorb excess resin from the laminate. This results in a higher fiber content and a stronger laminate overall. The breather fabric is cut larger than the carbon fiber fabric but smaller than the base plate.
Finally, the vacuum bag film is cut. It is cut larger than the base plate. Its purpose is to create an airtight vacuum bag.
Step 3: Applying the Epoxy Resin
In this example, Gurit SP106 epoxy resin is used. With epoxy resins, the mixing ratio of resin to hardener must be precise. For SP106, the ratio by volume is 5 parts resin to 1 part hardener. The resin and hardener are mixed in a mixing container by stirring slowly and thoroughly to ensure complete blending. Epoxy can easily cause skin sensitization, so protective gloves and clothing must be worn during handling.
Laminating begins by applying epoxy to the correct area of the base plate using a mohair roller. Then, the carbon fiber fabric is placed on top of the epoxy. The fabric is gently pressed into the epoxy with the mohair roller, and a small amount of additional epoxy is applied on top. Next, the following layer of fabric is positioned. This process is repeated until all fabric layers are in place. Tip: The carbon fiber layers can be laminated between two plastic films. This self-made “prepreg” can then be cut with scissors into the desired shape without the fabric fraying.
The thickness of the carbon fiber plate can be increased using, for example, a PVC foam core. When using a PVC foam sheet, it is important to apply a generous amount of epoxy both below and above the foam to ensure that the carbon fiber fabric is fully saturated and does not remain dry.
Step 4: Vacuum Bagging
If peel ply is used, it is placed directly on top of the laminate. After that, the release film and breather fabric are laid in order.
The sealant tape is pressed onto the edges of the mold. Note: The sealant tape will not adhere to areas where release wax has been applied.
The vacuum hose is positioned and sealed airtight around the hose using sealant tape. It is recommended to place an extra layer of breather fabric at the hose end—this prevents excess resin from entering the hose. Resin traps are also available for this purpose. To connect the hose, quick connectors or disposable plastic fittings can be used.
The vacuum bag film is pressed firmly onto the sealant tape. The bag must be completely airtight—a small hole is enough to prevent proper vacuum from forming. The connectors in our selection are compatible with ¼" hoses.
The vacuum pump is set to 0.5–1 bar and then started. The vacuum must be maintained continuously until the epoxy has fully cured.
Step 5: Finished Part
Once the epoxy resin has cured, the vacuum bagging setup can be removed. It is recommended to leave the peel ply in place until the laminate is coated or painted. The laminate can be finished, for example, with a 2-component polyurethane varnish.