Boat Repair Guides with Various Techniques
REPAIR WITH POLYESTER RESIN

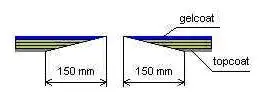
When repairing a hole in a fiberglass boat, the lamination repair should ideally be done from the inside (i.e., the uneven, rough, non-smooth mold surface). Start by sanding the damaged area roughly 15 cm beyond the edges in all directions using sandpaper grit 40–60. Sand deeper at the damaged spot itself and gradually feather off towards the intact laminate. If you use a power sander, finish by manually scratching the surface to create an even rougher bonding area.
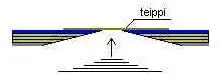
If necessary, tape the hole shut from the outside. The lamination work itself must be done using regular chopped strand fiberglass mat (CSM) to ensure proper adhesion. If you want to use any woven fabric in the repair, always start with the chopped strand mat. Tear or cut dry pieces of mat sized appropriately - the largest piece should cover the entire sanded area, with subsequent pieces gradually smaller.
You will need approximately 1 kg of polyester resin per 1 m² of mat. Add hardener to the polyester resin at a rate of 1% at about 20°C or 1.5% at 15°C. This mixture gives a working time of 35–45 minutes. Always apply polyester resin first, then lay the mat on top. Begin laminating by applying resin underneath the largest piece of mat, ensuring no air remains trapped under the fabric. Use a hard roller to press out air bubbles or “pounce” with a brush. For small repairs, a brush alone is sufficient. For larger jobs exceeding 1 m² of mat, it is better to use both a roller and a brush. Subsequent layers of fiberglass mat can be laminated immediately on top. However, if you must work from bottom to top, allow the first mat to cure before applying the next layers. Before painting with topcoat, sand away any sharp edges or other major surface imperfections.

Topcoat or gelcoat for the surface finish? Topcoat is used like paint when repairing existing laminate surfaces. Gelcoat, in contrast, is applied against the mold and cures without moisture in the air. For repairs, always choose topcoat.
Apply topcoat twice to ensure proper water resistance. Allow a maximum of 6 hours between coats without sanding.
- Use proper protective gloves.
- Clean tools with acetone.
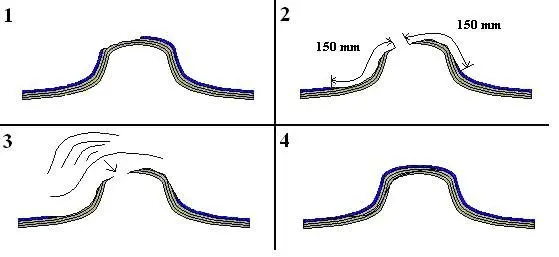
Now you can remove the outside tape and sand the repair area ready for painting. It’s advisable to apply protective tape before sanding. Because topcoat is not self-leveling, it must be applied in sufficient layers (2–4 coats) to prevent the film from breaking when wet sanding. To restore the original smooth finish, use wet sanding paper with grit size 1000 or finer. When repairs must be done from the outside, ensure there is enough space left for about 0.5–1.0 mm of topcoat after laminating.
The following pictures illustrate a common method for repairing the keel of a rowboat. If the boat has polyurethane foam filling between the outer and inner shells - which often absorbs some water - this wet area must be removed and replaced with new polyurethane foam.
- Note that spray foam in pressurized cans is not suitable for filling cavities but is intended for sealing joints, where moisture is continuously available for expansion.
- Polystyrene (Styrofoam) is not compatible with polyester resin.
Using the method described above, with some modifications, other composite laminate damages can be repaired easily. Examples include re-laminating a detached bench in small boats or fixing loose floor stringers in larger boats. Never neglect thorough sanding and roughening of the repair area.
- Wiping the finished composite surface with chemicals like acetone will not create a bonding surface.
- Polyester resin and topcoat keep best in cool conditions (even freezing) away from sunlight.
- The recommended working temperature is about 20°C.
- Mix thoroughly before use.
Back to Polyester Resin Products.