VACUUM BAGGING
Vacuum bagging starts with an open mold. One mold surface is replaced by a vacuum bag. In the basic method, resin is drawn into the reinforcements using vacuum. In some cases, resin infusion can be accelerated with positive pressure. Naturally, the positive pressure must be lower in absolute value than the vacuum pressure for the method to work. Resin flow can be enhanced with separate resin flow layers, special reinforcements, and in sandwich structures, also with grooves in the core material. Various meshes are used as resin flow layers. Special reinforcements include combination fabrics where, in addition to normal reinforcements, there is a felt layer that conducts resin very well.
The principle of the vacuum bagging method is illustrated in the image below. If both surfaces of the product are to be smooth or if the production volume is sufficient, the vacuum bag can be replaced by a flexible mold half, which often also incorporates resin flow channels and mold edge seals. The flexible mold is typically made of silicone or a thin fiber-reinforced plastic shell.
On this page, we’ve outlined a few different methods. You can find more information here.
Vacuum Bagging
In vacuum bagging, the part is made using an open mold. One side of the mold is replaced with a vacuum bag or a flexible mold half. In the basic method, resin is drawn into the reinforcement layers using vacuum. In some cases, the injection process can be accelerated using positive pressure. Naturally, the applied positive pressure must be lower in absolute value than the vacuum pressure for the method to function properly. Resin flow can be enhanced using flow media layers, specialty reinforcements, or grooved core materials in sandwich structures. Various mesh fabrics are used as flow media. Examples of specialty reinforcements include combination fabrics with an additional resin-conducting felt layer.
The basic principle of the vacuum bagging process is shown in the diagram below. If a smooth surface is desired on both sides of the product, or if production volume is high enough, the vacuum bag can be replaced with a flexible mold half. This mold often includes integrated resin flow channels and sealing edges. Flexible molds are typically made of elastomers or reinforced plastic.

In film infusion, the resin matrix is in the form of a film, either placed directly on the mold surface or layered between dry reinforcement layers. The resin is in a semi-cured B-stage, so it must be heated to become fluid before the actual infusion process. The resin mainly flows through the thickness of the reinforcement layers, resulting in a very short flow path—a clear advantage of the method.
Compared to hand lay-up, infusion methods are faster and offer better repeatability. These are closed processes, so volatile compounds do not escape into the work environment. Laying the dry reinforcements into the mold is relatively easy. If needed, the reinforcement layers can be bonded together mechanically or using adhesive, such as spray glue. Compared to pressure injection, vacuum and film infusion offer the advantage of using more affordable open molds.
Vacuum Bagging with Hand Lay-Up
This guide provides an example of manufacturing a carbon fiber plate using hand lay-up combined with vacuum bagging.
Materials needed: Epoxy resin, carbon fiber fabric, mohair roller, acetone, release agent, mixing cup and stir stick, sharp scissors, lint-free cloth, vacuum bagging film, breather fabric, release film, (peel ply), sealant tape, vacuum pump, hose and base plate (e.g., sheet metal)
Step 1: Preparing the Mold Surface
Clean the mold surface of grease, dirt, and dust using acetone. Chemtrend’s Mold Cleaner EZ is also suitable for this purpose.
There are many types of release agents available. In this example, Chemtrend’s Chemwax is used. It is a high-quality release wax suitable for composite part demolding. Apply the wax evenly using a lint-free cotton cloth: first vertically, then horizontally. When viewed against light, the wax should cover the entire surface. Note! Do not apply wax to the edges of the base plate where the sealant tape will be placed, as it may prevent proper adhesion.
Step 2: Cutting Fabrics and Films
Cut the carbon fiber fabric to the desired size. This example uses Hexcel Primetex 160 g/m² twill weave carbon fiber fabric. Cut all required layers in advance. For optimal strength, orient the fabric layers in different directions.
Peel ply is used if the laminate will be coated or painted afterward. It roughens the surface and protects it from dirt and dust. It also eliminates the need for sanding before coating. Cut the peel ply slightly larger than the carbon fiber fabric. Peel ply is optional.
Release film prevents the laminate from sticking to the breather fabric. It should be perforated to allow excess resin to escape. Cut the release film larger than the carbon fiber but smaller than the base plate.
Breather fabric absorbs excess resin, improving fiber content and laminate strength. Cut it larger than the carbon fiber but smaller than the base plate.
Finally, cut the vacuum bagging film, making sure it's larger than the base plate. Its purpose is to make the vacuum bag airtight.
Step 3: Applying the Epoxy Resin
This example uses Gurit SP106 epoxy resin. The resin and hardener must be mixed in an accurate ratio—5 parts resin to 1 part hardener by volume. Mix the resin gently and thoroughly in a mixing cup. Important: Epoxy can be a skin sensitizer. Always wear protective gloves and clothing.
Begin by applying epoxy with a mohair roller to the designated area of the base plate. Then place the carbon fiber fabric onto the epoxy and gently press it in using the roller. Add a bit more epoxy on top, then lay down the next fabric layer. Repeat until all layers are in place. Tip: Carbon fiber layers can be laminated between two plastic films to create a “prepreg.” You can then cut this to shape with scissors without fraying the fabric.
To increase the thickness of the laminate, a PVC foam core can be used. When using this, apply plenty of epoxy on both the top and bottom to ensure full wet-out of the fabric.
Step 4: Vacuum Bagging
If using peel ply, place it on top of the laminate. Then add the release film and breather fabric.
Press the sealant tape along the mold edges. Note: It won’t adhere properly to areas covered in release wax.
Place the vacuum hose and seal around it tightly with sealant tape. You may add an extra layer of breather fabric at the hose end to prevent resin from entering the hose. Resin traps can also be used. Quick connectors or disposable plastic fittings are available for hose attachment.
Seal the vacuum bagging film to the sealant tape. The bag must be completely airtight—even a small leak will prevent sufficient vacuum from forming. Our connectors are compatible with ¼" hoses.
Set the vacuum pump to 0.5–1 bar and start the pump. Maintain vacuum until the epoxy is fully cured.
Step 5: Finished Part
Once the epoxy is fully cured, remove the vacuum bagging materials. Leave the peel ply on the laminate surface until it's time to coat or paint it. You can finish the laminate with a 2-component polyurethane clear coat, for example
Vacuum Bagging with Infusion
Vacuum infusion is a modern manufacturing method used to produce high-quality composite structures in a controlled and efficient way. The process is based on placing dry fiber reinforcements into a mold and sealing them with vacuum bagging materials to create an airtight system. Resin is then drawn into the fiber layers using vacuum pressure. Unlike traditional hand lay-up, no brush or roller is used to apply resin; instead, the resin is pulled through the fiber stack by vacuum in a closed system. This greatly reduces solvent emissions, improving cleanliness and workplace safety.
Vacuum infusion enables the production of lightweight, dimensionally accurate, and defect-free laminates with an optimized resin-to-fiber ratio. It is an excellent method for technically demanding applications, such as manufacturing composite parts for boats, vehicles, wind turbine blades, sports equipment, and the construction industry.
Materials and Equipment
The materials and supplies used in vacuum infusion must be carefully selected to ensure a successful process. Common items include:
- Vacuum bagging films, must be resin-resistant and form the outermost airtight layer
- Peel plies and/or release films, to prevent other layers from sticking to the laminate
- Flow media or resin channels, to ensure even resin distribution across the laminate
- Sealant tape, used to attach the vacuum film to the mold and seal the system
- Hoses, connectors, and valves, for controlling resin flow and vacuum pressure
- Reinforcements, such as fiberglass, carbon fiber, or hybrid fabrics
- Resins, epoxy, polyester, or vinyl ester resins with appropriate viscosity for infusion
In addition, a reliable vacuum pump is needed to maintain sufficient vacuum throughout the entire process, along with a possible resin trap and a vacuum gauge
Process Steps
The vacuum infusion process consists of several stages that require careful preparation and the use of suitable materials. The first stage is mold preparation, where the mold is ensured to be clean and a release agent is applied. You can read more detailed instructions for applying the release agent here..
After this, dry fiber reinforcements—such as fiberglass, carbon fiber, or aramid fabrics—are placed into the mold.

First, a peel ply, release film, or both are laid over the fibers. If peel ply is used, it should be placed first, directly against the reinforcement. After that, the resin flow mesh is applied. All three of these materials can be used separately, but there are also combination materials, where these materials are integrated together on a single roll. We sell three different resin flow meshes in our online store. OM70 is the slowest at transporting resin. The medium-speed resin flow mesh is Infupeel Dianet 135The medium-speed resin flow mesh (a combination of peel ply, release film, and flow mesh), and the fastest resin transport is provided by Infuplex Flonet (a combination of release film and flow mesh)
Depending on the size of the part being manufactured, resin flow can be improved by using various resin feed channels or spiral tubes. The resin inlet is connected on top of the channel. It is usually recommended to attach the connector to the channel before applying the vacuum bag, so the hole in the bag can be kept as small as possible.
It is not desirable for resin to flow out of the laminate toward the vacuum pump—into the vacuum lines, the resin trap, or especially into the pump. This kind of leakage is prevented using various flow brake materials. Brake material stops the fastest-moving part of the resin front and gives the slower areas time to catch up, so that the entire composite laminate can be fully impregnated with resin. These brake materials are characterized by the fact that they block resin flow while still allowing air to pass through. The brake material is placed between the laminate and the vacuum line.
The vacuum bag is sealed tightly to the mold using sealant tape.
Hoses, connectors, and resin feed lines are connected to the system, and their placement affects flow control. The fittings and hose connections are sealed from the outside of the bag with additional sealant tape.
Once the system is sealed, the vacuum pump is started to evacuate air from inside the laminate and seal the entire structure. The vacuum bag's airtightness should always be checked before starting resin infusion. If there is a leak, resin will not flow correctly, and air may remain in the laminate. Only after a stable vacuum and a leak-free system have been confirmed should resin be introduced into the laminate from the container. The vacuum pulls the resin through the laminate, thoroughly saturating the fiber material throughout the structure. The progress of the infusion must be monitored closely. Resin flow can be controlled using shut-off valves or by adjusting the number of feed points.
Once the resin has reached all desired areas and the fibers are fully saturated, the resin inlet is closed. The vacuum should be maintained in the bag. Finally, the resin is allowed to cure according to the manufacturer’s instructions, either at room temperature or with heat.
Advantages of Vacuum Infusion
One of the most significant advantages of vacuum infusion is the consistently high quality of the end product from one part to the next. Since the resin is drawn into the fiber layers under vacuum, air is efficiently removed from the system. This prevents air voids or excess resin from forming in the laminate, resulting in structurally strong yet lightweight parts.
Because the resin is handled in a closed system, the release of volatile organic compounds (VOCs) into the air is minimal. The workspace remains cleaner, and working conditions improve significantly compared to open molding methods.
Material efficiency is also a major benefit. Only the necessary amount of resin is used, minimizing waste. This reduces material costs, improves repeatability, and simplifies quality control.
It is important to note that successful vacuum infusion requires good planning, testing, and practice. We recommend starting with small-scale trials before moving on to full-sized parts.
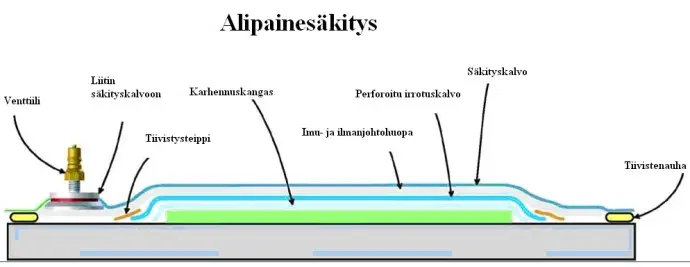
Märkälaminoinnissa lujitteet laminoidaan käsin avoimeen muottiin. Laminoinnin jälkeen muotti tiivistetään ja alipaineen avulla ylimääräinen hartsi imetään pois laminaatista.
Laminointivaiheessa on tärkeää käyttää oikea määrä hartsia lujitteiden kostutukseen. Liian vähäinen hartsi heikentää kerrosten välistä leikkauslujuutta ja voi aiheuttaa laminaattiin huokoisuutta. Toisaalta hartsin liiallinen käyttö ei paranna lopputulosta, vaan lisää rakenteen painoa tarpeettomasti.